Pour water in. Pump it up. Let it go.
The pour is the interesting one, and the reason is that everyone gets it backwards in the same direction. More water feels like more rocket — it is the stuff that comes out of the bottom, it is visibly heavy, you can feel it in your arms. And it is the reaction mass, so that instinct is not wrong. It is just only half of the thing, because the water is also the lid on the spring. Every millilitre you add is a millilitre of air you took away, and the air is where every joule in the whole machine is stored.
So the two halves pull against each other, and they do not pull equally hard.
The load with the most energy in it is not the load that flies highest
Six bar on the dial, water out through the bottle’s own neck:
| fill | spring energy | of peak energy | apogee | of peak apogee |
|---|---|---|---|---|
| 5% | 68 J | 16% | 49.9 m | 82% |
| 10% | 130 J | 30% | 56.1 m | 92% |
| 15% | 188 J | 43% | 59.2 m | 97% |
| 20% | 240 J | 56% | 60.6 m | 99% |
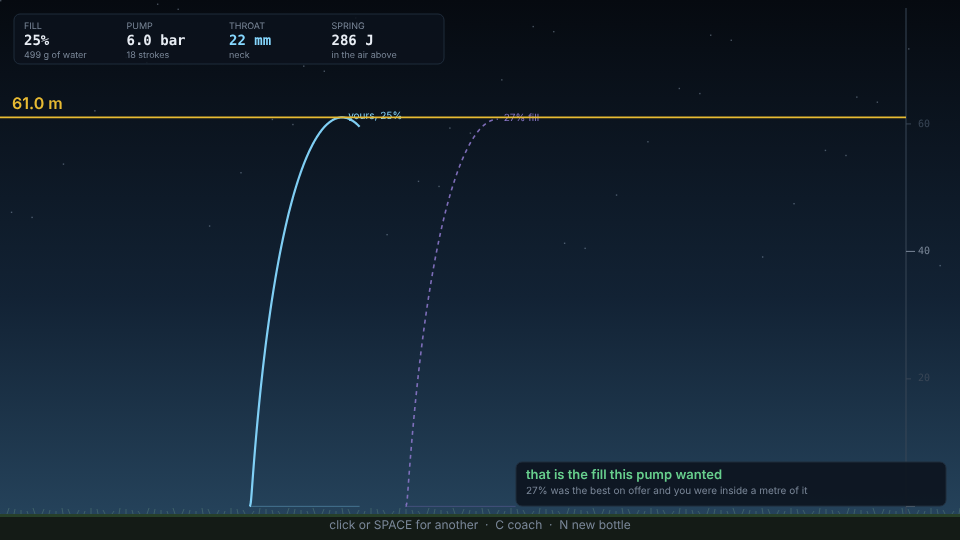
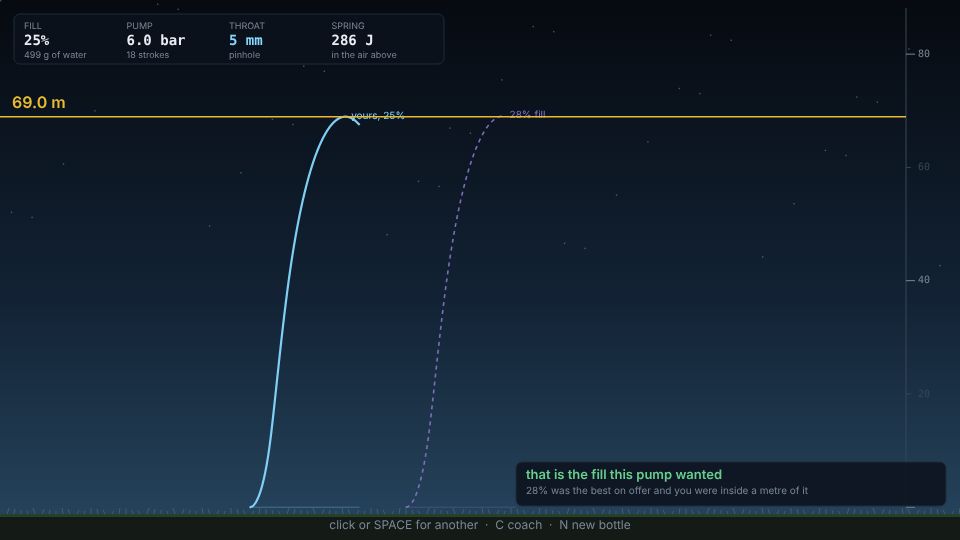
| 25% | 286 J | 66% | 61.0 m | 100% |
| 30% | 326 J | 76% | 60.7 m | 99% |
| 40% | 389 J | 90% | 58.1 m | 95% |
| 50% | 425 J | 98% | 53.4 m | 88% |
| 55% | 431 J | 100% | 50.1 m | 82% |
| 65% | 421 J | 98% | 40.5 m | 66% |
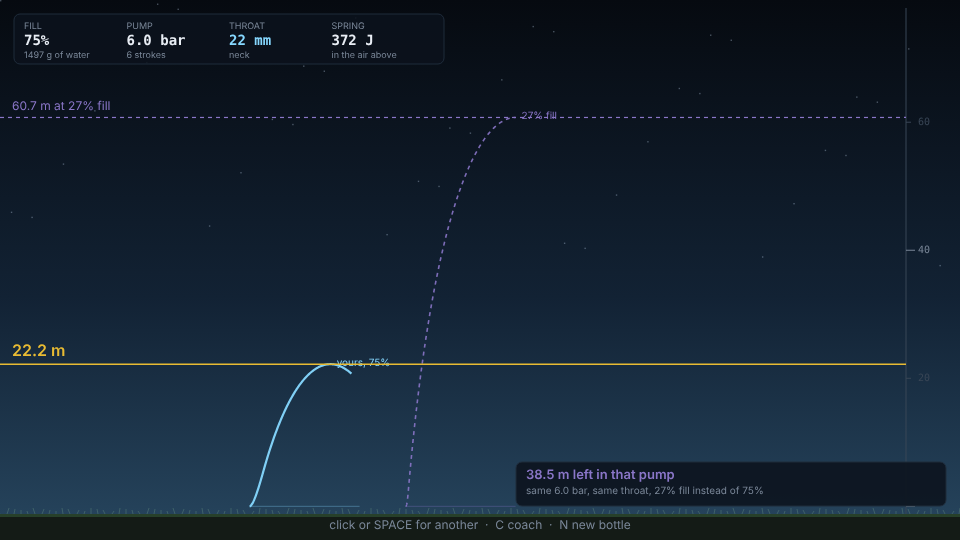
| 75% | 372 J | 86% | 22.2 m | 36% |
| 85% | 223 J | 52% | 3.8 m | 6% |
| 90% | 149 J | 35% | 1.3 m | 2% |
The two peaks are thirty points of fill apart. At 55% you are holding half again as much energy as the load that wins, and you fly eighteen per cent lower with it. Pumping harder would not fix that; nothing about that bottle is short of energy. It is short of somewhere to put it.
Which is the lesson, and it is more general than bottles: for a fixed amount of
stored work, momentum goes as sqrt(2mE). Energy is the thing you can measure
on the pad, and momentum is the thing that flies. A design optimised against the
gauge you happen to have is optimised against the wrong quantity, and the error
does not announce itself — a 55%-full bottle reads better on every instrument
on the launch pad than the one that beats it.
The curve is lopsided, and the dangerous side is the intuitive one
- 95% of best: anywhere from 13% to 40% fill
- 50% of best: 3% to 72%
Twelve points of slack below the peak, fifteen above — but keep going and the two sides come apart completely. Empty the bottle almost entirely and you still get 82% of the best flight. Fill it three-quarters and you get 36%. An almost empty bottle flies better than a mostly full one, and the direction everybody errs in is the one with the cliff on it.
The second fill line
There is a hard wall further out, and it is the part of this I did not expect to be so clean.
The gas above the water can only expand so far before it is down to room
pressure, and that factor is (P/Patm)^(1/γ) — nothing to do with the bottle,
everything to do with the pump. If the water you poured is deeper than that
expansion can reach, the pressure equalises with water still in the bottle, and
that water is ballast. You carry it to apogee and you bring it home.
| pump | gas can grow | pour no higher than | left at 60% fill | at 75% | at 90% |
|---|---|---|---|---|---|
| 2 bar | 2.18× | 54% | 257 ml | 911 ml | 1564 ml |
| 3 bar | 2.67× | 63% | — | 664 ml | 1465 ml |
| 4 bar | 3.13× | 68% | — | 433 ml | 1373 ml |
| 6 bar | 3.98× | 75% | — | 9 ml | 1204 ml |
| 8 bar | 4.76× | 79% | — | — | 1047 ml |
| 10 bar | 5.50× | 82% | — | — | 901 ml |
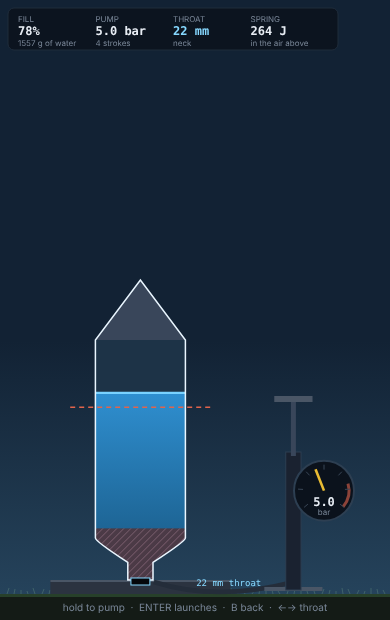
So “how much water is too much” is not a property of the bottle. It is a property of the dial, it moves by nearly thirty points across the range of a hand pump, and it is the one coupling between two controls that the controls themselves give you no way to see. That is the picture on the demo’s bottle: the line you poured to, and a dashed line showing where the air gives out. When the dashed one is underneath, the band between them is hatched, and that band is luggage.
It is worth being precise about how much of the damage this accounts for, because it is less than it looks. At 4 bar the usable line sits at 68% —
| fill | poured in | never leaves | apogee |
|---|---|---|---|
| 60% | 1198 g | — | 31.4 m |
| 68% | 1357 g | — | 18.9 m |
| 75% | 1497 g | 433 ml | 6.8 m |
| 90% | 1796 g | 1373 ml | 0.5 m |
— and the flight was already ruined at 68%, where nothing is stranded at all. The wall is not what kills an over-filled bottle. It is what is waiting for it after it is dead.
The throat is a clock, not a lever
Here is the one you can prove on paper before you simulate it. Thrust from a
water rocket is 2·A·ΔP, and the time to expel a volume dVw is dVw/(A·ve).
Multiply:
Thrust·dt = 2·A·ΔP · dVw/(A·ve) = sqrt(2·ρw·ΔP) · dVwThe area cancels. Total impulse does not depend on the nozzle at all. Which the simulation then agrees with, to four digits, across a 250-fold range of throat area:
| throat | burn | analytic impulse | simulated | gravity loss | drag loss | burnout speed | burnout height | apogee |
|---|---|---|---|---|---|---|---|---|
| 2.5 mm | 7680 ms | 19.29 N·s | 21.24 N·s | 75.3 m/s | 4.4 m/s | −4.3 m/s | 25.0 m | 26.0 m |
| 3 mm | 5333 ms | 19.29 N·s | 21.24 N·s | 52.3 m/s | 12.9 m/s | 6.3 m/s | 48.6 m | 50.5 m |
| 4 mm | 3000 ms | 19.29 N·s | 21.24 N·s | 29.4 m/s | 23.0 m/s | 19.1 m/s | 54.0 m | 67.7 m |
| 5 mm | 1920 ms | 19.29 N·s | 21.24 N·s | 18.8 m/s | 24.3 m/s | 28.4 m/s | 44.6 m | 68.5 m |
| 6 mm | 1333 ms | 19.29 N·s | 21.24 N·s | 13.1 m/s | 22.6 m/s | 35.8 m/s | 35.6 m | 67.1 m |
| 9 mm | 592 ms | 19.29 N·s | 21.24 N·s | 5.8 m/s | 15.4 m/s | 50.3 m/s | 19.2 m | 63.6 m |
| 13 mm | 284 ms | 19.29 N·s | 21.24 N·s | 2.8 m/s | 9.1 m/s | 59.7 m/s | 10.1 m | 61.5 m |
| 22 mm | 99 ms | 19.29 N·s | 21.25 N·s | 1.0 m/s | 3.6 m/s | 66.9 m/s | 3.7 m | 60.1 m |
| 32 mm | 47 ms | 19.29 N·s | 21.26 N·s | 0.5 m/s | 1.8 m/s | 69.3 m/s | 1.8 m | 59.6 m |
| 40 mm | 30 ms | 19.29 N·s | 21.27 N·s | 0.3 m/s | 1.1 m/s | 70.1 m/s | 1.1 m | 59.5 m |
(The simulated column runs about 2 N·s over the analytic one at every row because the analytic figure is the water phase only; the rest is the air blowing down behind it. The gap closes to exactly zero when the fill is high enough that the air never gets a turn — see the first check table below.)
Same push, every time. What changes is the schedule, and the schedule is worth nine metres — 15% on the worse of them. Read the two loss columns and the reason is right there, pointing opposite ways:
- Gravity charges by the second. The 2.5 mm throat burns for seven and a half seconds and hands gravity 75 m/s — more than the whole impulse was worth. That rocket is still burning when it starts coming down, which is why its burnout speed is negative.
- Drag charges by the square of the speed. The 40 mm throat is doing 70 m/s at one metre off the pad, and at that speed the air is pushing back ten times harder than gravity. It spends the rest of the flight paying for a burn it finished in thirty milliseconds.
Between the two there is a real interior optimum, and the burnout-height column is where you can watch it work: the winning rocket is 45 metres up and only doing 28 m/s when the water runs out. It climbed on thrust instead of being thrown. A slow climb is cheap because the atmosphere bills by v².
And the best throat changes sides
The balance between a cost that scales with time and a cost that scales with speed² depends entirely on how much push you have, so the answer swings by an order of magnitude across the pump’s range:
| pump | best throat | apogee there | 5 mm | 9 mm | 22 mm |
|---|---|---|---|---|---|
| 1.5 bar | 29 mm | 21.3 m | 12.9 m | 19.3 m | 21.1 m |
| 2 bar | 30 mm | 28.0 m | 21.3 m | 26.8 m | 27.9 m |
| 2.5 bar | 16.5 mm | 33.8 m | 29.4 m | 33.5 m | 33.8 m |
| 3 bar | 9.5 mm | 39.3 m | 36.8 m | 39.3 m | 38.9 m |
| 4 bar | 6 mm | 49.9 m | 49.5 m | 49.1 m | 47.7 m |
| 6 bar | 4 mm | 70.3 m | 69.1 m | 64.0 m | 61.0 m |
| 8 bar | 3 mm | 90.3 m | 84.0 m | 75.2 m | 71.1 m |
| 10 bar | 3 mm | 109.0 m | 96.0 m | 84.3 m | 79.2 m |
The pinhole and the neck trade places between 3.4 and 3.6 bar, and at 3.4 bar they are within half a metre of each other, which is as clean a crossover as you could ask for. Below it the pinhole is a mistake; above it the neck is leaving a third of the flight on the table. Nothing about either piece of hardware changed.
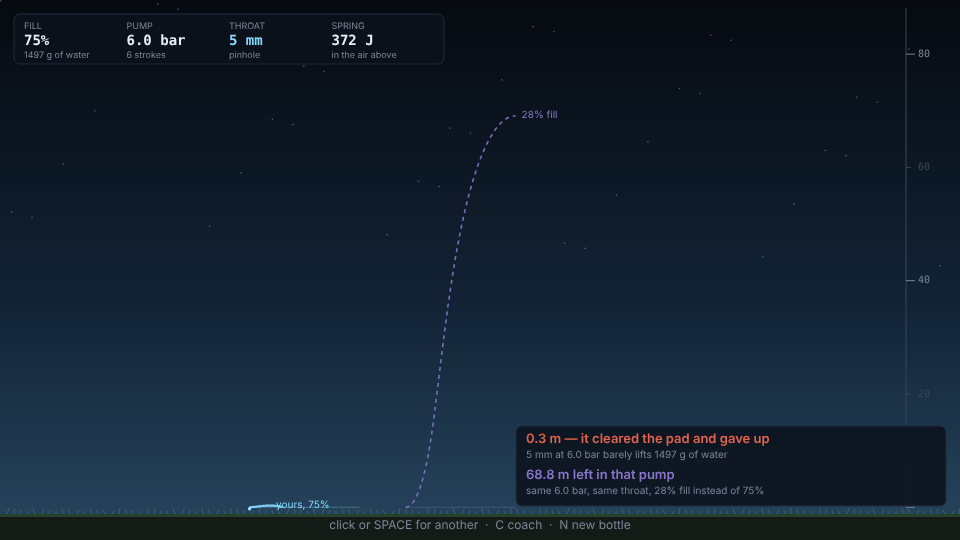
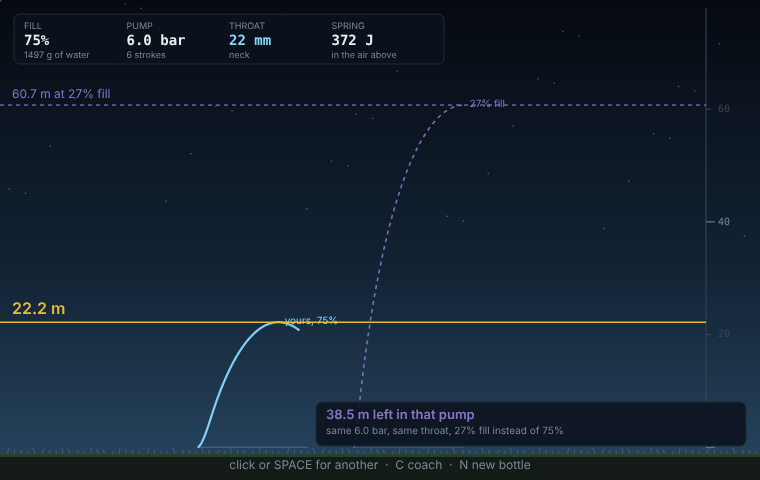
And the pinhole’s failure mode is not gradual. Three-quarters full at 6 bar, the neck manages a miserable 22 m; the 5 mm throat on the same bottle gets 0.29 m. It is not that it cannot lift — 23.6 N against 15.7 N of weight is a thrust-to-weight of 1.5, and it does leave the pad. It is that at 1.5 the margin is thinner than the rate the pressure decays, so the thrust falls under the weight within a few centimetres and the thing settles back down with most of its water still aboard. The neck’s T/W on the identical load is 29.
The best throat in the set is the one that needs you to have got the other two dials right first.
Two more, briefly
Each extra bar is worth less than the last, and the bottle has an opinion. 2→3 bar buys 11.1 m; 10→11 bar buys 3.5 m. Nominal burst for a sound 2 L PET bottle is around 11.5 bar gauge, and it drops with every cycle and with warmth. The demo draws each bottle a hidden limit between 9.4 and 11.6 bar and lets the wall tell you — crazing and a shiver, about 1.7 bar out. Worth listening to: the last bar on the dial is three metres of altitude against the whole round.
A heavier rocket flies higher, up to a point, and wants more water.
| dry mass | best fill | apogee | burnout |
|---|---|---|---|
| 50 g | 18% | 49.7 m | 95.0 m/s |
| 100 g | 25% | 61.0 m | 68.7 m/s |
| 150 g | 29% | 62.9 m | 55.4 m/s |
| 200 g | 32% | 60.3 m | 47.1 m/s |
| 500 g | 42% | 33.7 m | 26.8 m/s |
Taping 50 g of dead weight to a 100 g rocket buys you two metres. Same reason as the throat: mass is ballistic coefficient, the lighter rocket leaves the pad faster and gets charged v² for it. The 50 g version hits 95 m/s and does not get to keep any of it.
Playing it
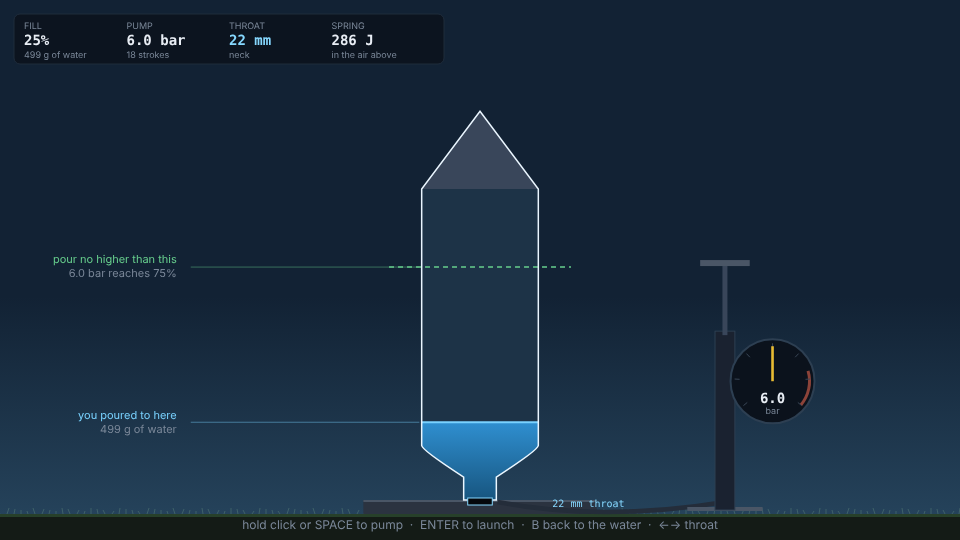
- Pour — drag up and down, or
↑↓. The bottle fills; when the pump has any pressure in it you also get the dashed line saying how high you may safely pour. Click orSPACEwhen the level is right. - Pump — hold click or
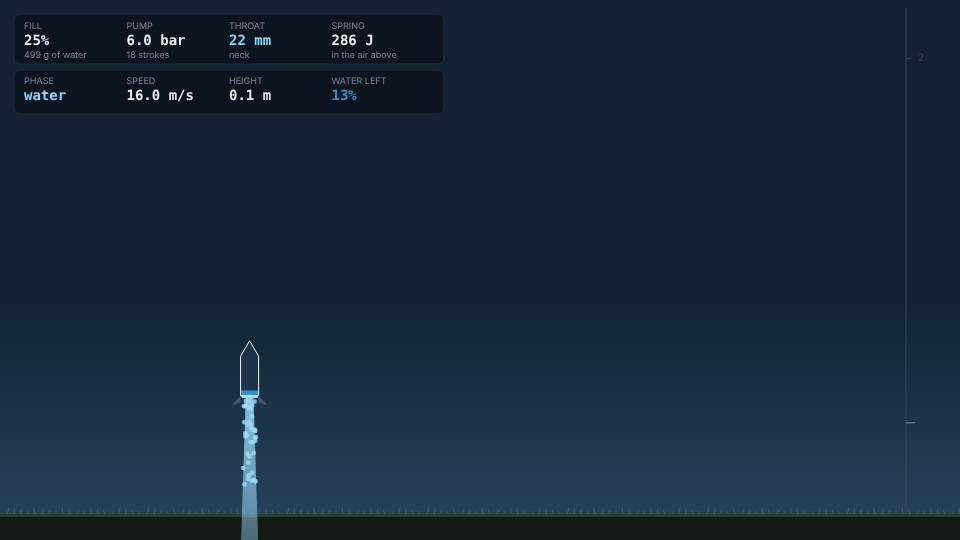
SPACE. Strokes are a fixed volume of atmospheric air, so a nearly-full bottle gets to pressure in a handful of them, which is its own small trap: over-filling makes pumping feel better. - Launch —
ENTER.Bgoes back to the water.
← → pick the throat · C toggles the coach · N is a fresh bottle · R
resets the best line.
When the flight settles, the view pulls back to frame it and runs the same pump and the same throat at the fill it should have been, as a second column beside yours. Most of the time the gap between the two columns is the entire piece.
Reuse
src/fill-line.mjs is a framework-free ES module and draws nothing. SI units,
absolute pressure in pascals; barG() and absFromBarG() convert to and from
what a dial reads.
flight({ fill, pressure, nozzle, bottle })runs one load to apogee and returnsapogee,vBurnout,yBurnout,tBurnout,impulse,gravityLoss,dragLossandstranded.samples: trueadds atrack;toGround: truekeeps going past apogee.bestFill(opts)golden-sections the fill curve. It is honest here in a way the equivalent in Skipstone was not — nothing in this model is an integer, the curve is smooth and single-peaked, and one run per point is a measurement rather than an anecdote.springEnergy,usableFill,strandedWater,expansionRatioare closed form and cost nothing, which is why the demo can draw the second fill line on every frame while you are still pouring.waterImpulse(load)is the analytic∫sqrt(2ρΔP)dVw— the thing the simulation is checked against.createRocket/step(s, dt)/pressureOf/airThroatif you want the flight itself.dt ≈ 5e-5while it is burning,1.5e-3coasting.fillSweepfor curves.scripts/measure.mjs <section>reprints every table above;scripts/screenshot-demo.mjsregenerates the media.
A flight is about a millisecond and a bestFill about thirteen, so the demo
computes its coach live rather than baking a curve the way Skipstone had to.
Gotchas
-
Nothing in this model is fitted. That is the nice thing about water rockets and it is worth saying plainly, because it is rare: the gas is an adiabat, the water is Bernoulli through an orifice, the air phase is isentropic nozzle flow (choked above a pressure ratio of 1.893, which it is for most of that phase), and drag is
½ρCdAv²with a textbookCd. The only choices are the bottle’s numbers — 2 L, 104.5 mm across, 100 g dry,Cd0.42 — and they are measurements of an object, not knobs. If you want different feel, change the object. -
The narrow-throat result is true in one dimension and a fantasy in three, and the model has no way to know that. Look at the thrust-to-weight of the optimum: at 8 bar the best throat is 3 mm, and that rocket leaves the pad at T/W ≈ 2.1 on a four-second burn. A real rocket at T/W 2 off a short launch tube does not go up for four seconds, it tips over — which is exactly why nobody flies pinholes and why hobbyists use big nozzles. The model says slow is better because, in 1-D, it is. What it is missing is that the slow rocket has to stay pointed, and staying pointed is bought with speed. Treat the throat table as a statement about losses, not a build recommendation.
-
There is no parachute, no recovery, no wind, and no tip-over. One degree of freedom, straight up. Adding pitch would change the throat answer above and nothing else in the piece.
-
The nozzle has no discharge coefficient. Real orifice flow is 0.6–0.98 of the ideal depending on how the hole is shaped, and at a few millimetres the quasi-steady Bernoulli jet is doing a lot of assuming. This matters for the absolute burn times in the first rows of the throat table, not for the shape of any curve in this piece — a
Cdon the throat divides the mass flow and multiplies the burn, and the impulse identity survives it untouched, because it survives anything that scales the effective area. -
The results are converged. Over a 120× timestep refinement (4e-4 s down to 5e-6 s in the burn), apogee at the reference load moves from 59.67 m to 60.18 m and total impulse from 21.311 to 21.243 N·s. The demo runs the coarse end of that for its coach and the fine end for your flight; the difference is smaller than the width of the apogee line.
-
The simulation is checked against closed form, and the check is exact in the one case where it can be. Where the fill is high enough that the air never gets to blow down, simulated total impulse and the analytic water integral agree to the last digit printed:
load analytic water impulse simulated total air phase share 15% @ 4 bar 7.87 N·s 9.76 N·s 19% 33% @ 6 bar 19.29 N·s 21.25 N·s 9% 50% @ 8 bar 29.34 N·s 30.92 N·s 5% 80% @ 4 bar 11.43 N·s 11.43 N·s 0% -
The pad is a hard floor, not a spring. A load whose thrust never beats its own weight has to sit there and dribble rather than fall through the ground, and
flight()has to be told to give up on it — hencelaunched, and the early break in the loop. The first version of this quietly reported an apogee of zero and a burnout velocity of minus something for every over-filled pinhole, which looked like a physics bug for longer than I would like. -
demo/bundles its own copy ofsrc/fill-line.mjs, self-contained by contract (ADR-0002). If you touch the module, copy it across again.